|
|
|
|
| Google Translation | ||
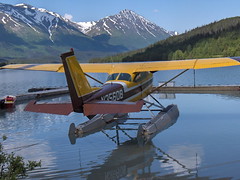
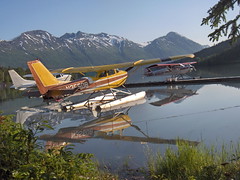
Northern Exposures: Flying FloatplanesCharlie Jackson[Top Page] [Previous Page] [Next Page] The fun part of flying float planes is the unbridled ability to land anywhere you have water. Alaska has more than three million lakes and several thousand rivers. You could fly to a different spot every day of your life, and never see it all. And most of these spots are only accessible by float plane -- there are no roads, rails or hiking trails. Of course, the challenging part of flying float planes is learning how to take off, land, and taxi on the water! (Click on any image to see a larger version.) |
Float plane taking off from Trail Lake |
 |
 |
 |
 |
 |
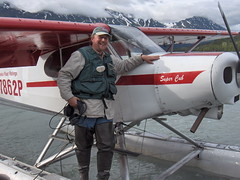
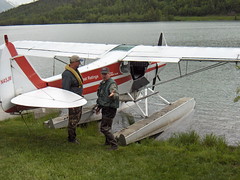
Lesson One: Getting InIt's not as simple as it looks -- the Piper Super Cub was not really designed for large people. (See photo at right.) The plane has enough room for 3/4 of a person in the front seat, and 3/4 of a person in the back. And wearing hip waders, a warm jacket, and an inflatable life vest didn't help matters. After more than a few embarrassing attempts, I learned to plant my left foot into the plane, arch my back over the top of the seat, then pull-in my right leg. This method, though far from comfortable or graceful, worked most of the time (although yoga exercises might have helped things). The next day, on my instructor's recommendation, I tried folding myself forward (butt-against-the-ceiling) and squeezing into the plane. It was clear that I could get in and out a bit faster -- but I think my instructor only mentioned it because he was tired of dodging my upside-down head each time I pulled myself in and out. Lesson Two: Dressing for SuccessTypical Bush Pilot gear includes hip waders, an inflatable vest, non-polarized sunglasses, and a cool hat. The hip waders come in handy for beaching the plane when no dock is available. (See photos below.) The white patch of cloth on the vest pocket is a piece of lambs wool, and holds fly fishing lures. And we use non-polarized sunglasses because we really need to see the surface of the water during landing and take-off. |
 |
|
 |
 | ||
 |
 |
 |
 |

Front panel
|
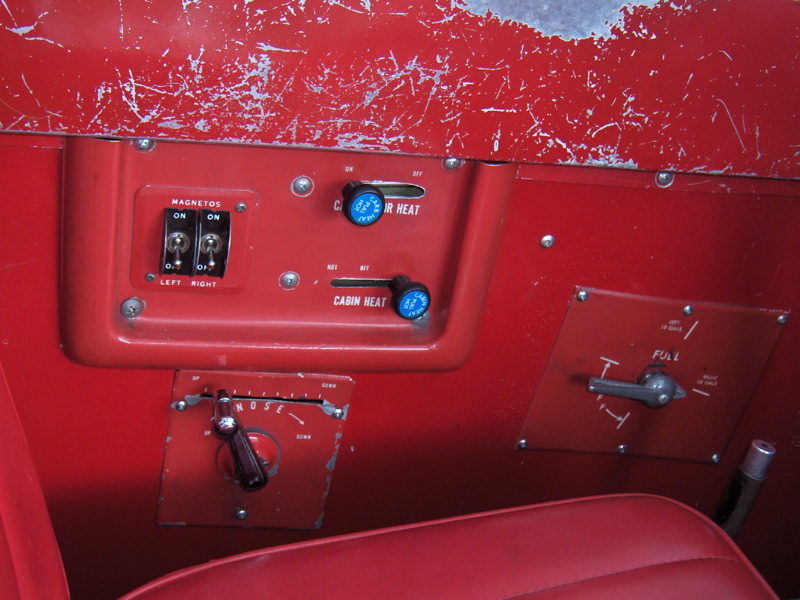
Left-side panel
|
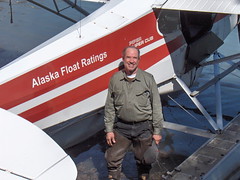
Charles McMurrough
My Flight Instructor |
If nothing else, the instructors at Alaska Float Ratings are serious about teaching strong stick-and-rudder flying skills. (Stick-and-Rudder refers to the pure art and technique of airmanship. You do not have an autopilot or computer coming between the airplane and the pilot. Each movement of the control stick gives you immediate feedback about how the airplane is flying. This is stick-and-rudder flying, and it is essential to flying in the mountains or the Alaskan bush.)
In all the other flying schools I'd been to, the owners beamed about what equipment was included in their student trainers. Garmin GPS, dual navcoms, glass panels, and so on. Here, the opposite was true -- in true stick-and-rudder fashion, the instructors bragged about what was not in the trainers. (You really had to sharpen your flying skills to fly these!)
The Super Cub's panels (shown at right) had quite a lot that wasn't there. There was no DG (Directional Gyro), no GPS (in fact, there were no electronic navigation instruments at all). The stall-warning horn had been disconnected, the artificial horizon had been removed, and the "Needle and Ball" indicator was deactivated so that only the "ball" worked. There was a transponder as well as a radio -- but only the instructor had a push-to-talk switch. The elevator trim indicator (left-side panel) had been removed.
And (much like the broken clock that is still right twice a day) the magnetic compass was only accurate when you were heading northeast!
Sheesh! Doesn't anything in this airplane work?
You don't need any of that stuff. You should be able to fly safely without any of that!
Charles --my flight instructor-- was right (as was his habit). Without a panel full of instruments, the pilot focuses on the art and technique of flying. Instead of getting second-hand feedback from an instrument, you get first-hand feedback directly from the airplane.
(This approach obviously does not apply to flying by instruments (IFR) -- but you don't fly IFR in the bush!)
| The film we called "Beaver Pilot" |
In high school Driver's Ed, I remember watching a film called Red Asphalt -- a "shock" film intended to make you a safer driver. On the first day of groundschool, we watched the floatplane pilot's version of Red Asphalt, a film that we all called "Beaver Pilot."
Several years ago, a Hollywood film crew was filming a DeHavilland Beaver landing on a lake. The pilot, it was said, had many thousands of hours in the Beaver, and was making yet-another routine landing for the film. The pilot, for whatever reason, neglected to raise the nose, causing the front ends of the floats to dig-in to the water, and sending the Beaver tumbling end-over-end.
Nobody wanted to be the next Beaver Pilot.
| Charlie landing on Trail Lake | View from the Shoreline |

You can't see glassy water! |
You cannot see glassy water -- even if you try really, really hard. This fact was drilled-into us from lesson one (and vividly demonstrated during the orientation flight). It's difficult to judge your height above something that you can't see -- and nobody wanted to be the next Beaver Pilot.
We spent quite a bit of time on landings.
The flight instructors devised several challenging flight exercises designed to perfect our landings. The first one, called Cleared to an Altitude of Two Inches involved finding a very long lake (we used the five-mile-long long, East-West segment of Kenai Lake -- pronounced "KEE-nigh"), and maintaining an altitude between two and twelve inches above the water. (Believe me, it's not as easy as it sounds!) The second exercise, called Vertical S-Turns, used the same five-mile stretch of lake. The goal was to land softly, take-off, climb to an altitude of 50 feet, and repeat over and over again.
The third exercise turned out to be one of my favorites. The idea was to land next to a selected spot, make a full circle (while remaining on the step), and taking-off again.
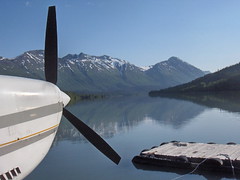
The StepAs a seaplane accelerates for take-off, it begins to hydroplane on the bottom-most edges of the floats. This "hydroplaning" phase is called being on the step. Your floats are barely touching the water as you hydroplane at near-takeoff-speed. |
Making a turn while on the step is an adrenaline rush all by itself. If you imagine intentionally putting your car into a high-speed turn on an icy road, you've got the idea. You, of course, have far more control over the floatplane, but the feeling is just the same.
We picked Lower Trail Lake for the first practice runs. Lower Trail Lake has a small island in the middle (see the map and the photo, below). The objective was to approach the lake from the north side and touch down abeam the tip of the island. Then, keeping the floatplane on the step (hydroplaning), we'd make a very wide circle on the lake, eventually coming around the other side of the island. Once we made a full circle, we'd take-off and do it all again.
Now, there is a lot more water to the west of the island than there is to the east, and the thought of coming through that narrower passage (while avoiding the rocks near the shoreline) made me swallow hard.

Heading back to Trail Lake |
Uhh, Charles (my flight instructor was also named Charles), are we going to have enough room for this? It looks kind of tight!
You try it and see! You're gonna be surprised at just how much room you really have!
Charles loved the Super Cub, and always enjoyed demonstrating it's amazing performance to me. (Or, more accurately, having me fly it and letting me see for myself.) We did this exercise several times. The Super Cub handled these "step-turns" with ease!
 |
Bush pilots must be able to fly in and out of very tiny lakes, while avoiding the surrounding mountains. To practice this, Charles selected Bench Lake (marked by the letter A on the map). Bench Lake is about one-fifth the size of Lower Trail Lake, and a tiny puddle compared to the five-mile-stretch we used at Kenai Lake. On the larger map, you can easily see Kenai Lake in the lower-left of the photo. Bench Lake is the tiny speck of water identified by the A.
Now, in this exercise, explained Charles, I want you to do a confined area landing on that lake. I want you to plan your approach so that you fly over the shoreline at about two feet. As soon as you touch down, put it into a turn, so we stop quicker. (Kind of like the way a skier stops.)

Brake pedals, but no brakes |
Although the Super Cub has brake pedals (click on the photo, right, for a closer view), they are not really attached to anything useful. Visualizing the upcoming landing, my brain supplied me with a countless variety of images, all showing us skidding across this bathtub-sized lake and crashing wildly into the opposite shore. I would most certainly be the next Beaver Pilot. I turned steeply onto final approach, avoiding the mountains, passed over the shoreline at just below two feet, and held my breath until the floats kissed the water with a reassuring "Shisssh."
Good landing, Charlie. Now, turn around and see how much lake you used.
I couldn't believe what I was seeing. I used less than a quarter of that tiny lake! Charles then had me practice my favorite "step turn" exercise, this time making Figure-Eights in our tiny, tiny lake. The Super Cub had no trouble.
You typically need more room for takeoff than for landing. So before you decide to land in a puddle-sized lake, you need to be very sure that you'll be able to get out again!
The first time I tried a confined area takeoff in a Super Cub, it felt like I was going up much faster than I was going forward. Almost like piloting an elevator! Charles said we were rising faster than a homesick angel, and that quote stuck with me.
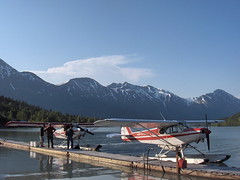
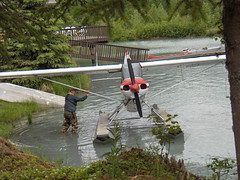
Most Alaskan lakes do not have seaplane docks, so it is important to know how to beach the plane. During our practice session at Bench Lake, Charles had me beach the plane. (I did not have my camera with me, so the photos below show fellow student Mark beaching his plane. Charles is in the back of the plane.)
Before leaving Bench Lake, Charles gave me a tour of the beaver dens along the lake's edge.
 |
 |
 |
 |
 |
| Mark demonstrates how to beach a Super Cub. | ||||
|
Returning to the Dock |
After nearly an hour at Bench Lake, Charles said it was time to head back to the dock. I was prepared to use the full-out confined area take-off, but Charles said we had more than enough room for a normal take-off. We did!
If you look at the map of Bench Lake, you'll see an even-tinier lake just to the south. This is Johnson Lake. I got my first up-close view of Johnson Lake just after lifting off from Bench Lake. At about 100 feet above the ground, Charles pulled the power off and announced, This is a simulated engine-out. You have no power. What do you do?
I had practiced emergency landings before, but never on such a microscopic lake. From 100 feet in the air, it looked only slightly larger than a hot tub. But I was gaining confidence in the abilities of the Super Cub, so I set-up for a power-off landing. The floats made that wonderfully soft "shisssh" sound as they touched the water. And I had only used a tiny fraction of the lake!
Happily, we flew back to the docks.